This is a small article to illustrate how you can set-up a 3DS Max file as a realtime showcase with my Viewport shader. This is not a walk-through tutorial to show you every button, it’s intended to offer some insight and tips on the settings that are at your disposal when using these tools.
Goal
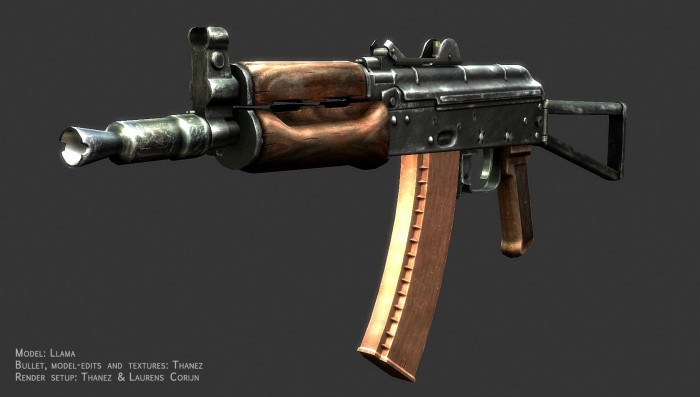
I’ll be explaining how me and Thanez set up this image, grabbed straight from Max’ viewport with Tools > Grab Viewport:
Model in question is an AKS74U created by Llama and Thanez for Source. I chose this as a subject because it’s not too complex to set up and still serves as a good introductory example.
Lights
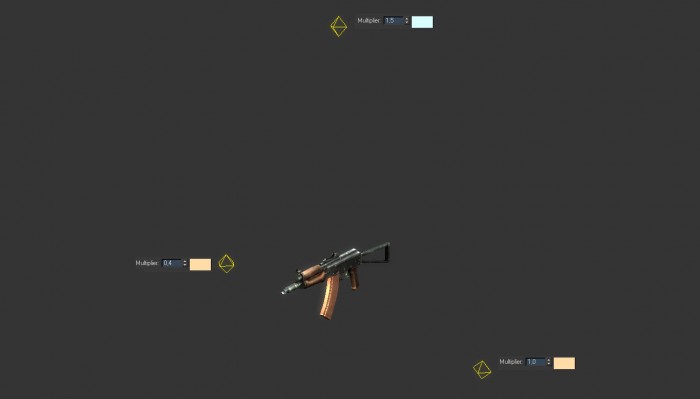
Important is to set up your lights decently. Use at least 2 for a showcase, and in this case Thanez made an interesting 3-light setup with a strong blue light from the top to simulate the sky, with two softer, warm lights to fill up the sides.
Parameters: Lights
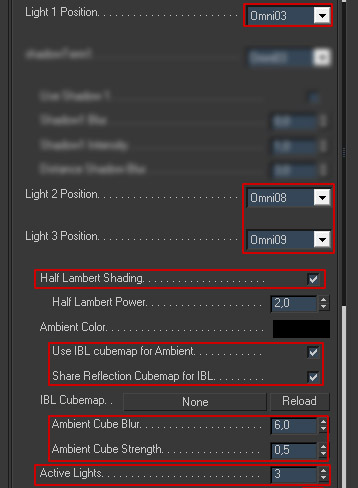
Biggest part of setting up a showcase scene, is setting the parameters right. Note how the number of Active Lights at the bottom, was set to 3. Every Light Position dropdown list, was filled with one of the 3 lights in the scene. Half Lambert was turned on to get a softer shading, but this is by no means necessary: the effect is minimal in this scene.
Ambient set up is a bit more complex. I chose to set up a cubemap for Image Based (IBL) ambient light. Instead of loading a separate cubemap, I enabled the option of just reusing the cubemap loaded in the fresnel section, which we’ll go over later. If you don’t do this, you can just use IBL cubemap slot to load one. Ambient cube blur was set to 6.0, which is mostly a good value, but this depends on the resolution of your cubemap. IBL cubes need to be blurred very hard to make sure the offer very generic, blurry lighting conditions. Strength was left at default 0.5, since this worked nicely.
Parameters: Maps
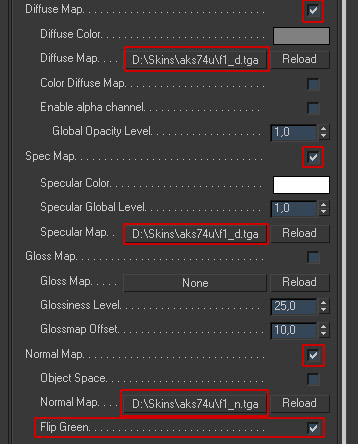
Setting up the maps is a vital part of defining the shader. This is very straightforward and consists only of loading the correct file in the correct slot, while not forgetting to enable the map by checking the tickbox. Thanez doesn’t have a separate specular map, so we just use the diffuse.
Note that you pretty much always need to tick “Flip Green” to have the normalmap show up correctly; Max interprets the green channel different than other applications.
Parameters: Fresnel
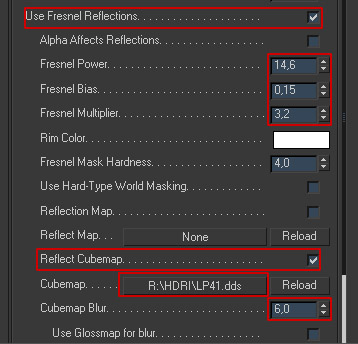 Fresnel effects are one of the unique features of my shader that can really help push things to another level. Fresnel effects are mostly, but not limited to reflections and settings to fake them. I enabled the global tickbox to have them show up in the viewport.
The fresnel settings are tweaked a lot for this specific object and cubemap: a high fresnel power is useful for minimizing the size of the reflecting rim. A small bias value makes sure there is some uniform reflection all over the surface of the object. The multiplier was increased a lot since Thanez’ specmap (which is actually the diffuse) is very dark and would hide the reflections if the multiplier was left at 1,0.
I have also loaded a cubemap that I converted from a collection of HDRI’s that Dosch Design sells (I can’t offer this one for download due to legal reasons, but you can get other cubemaps of my shader page). The final setting I tweaked, is the cubemap blur. This is actually a very important one; without it, the reflections would be sharp and crispy, like carpaint or chrome. For bumpy, worn metal, we want very blurry reflections, thus the blur value needed to be increased.
Post Processing
A nice effect that helps push things further, is a Bloom post-process. When used subtly, it adds a lot to an image, especially a showcase like this.
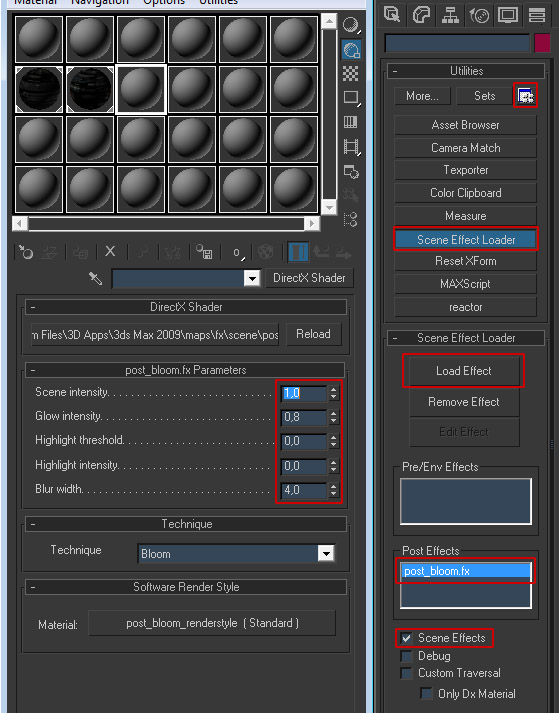
Max has an interface for this, called the Scene Effect Loader. This is an old system that has its quirks and is pretty much only useful for bloom. It can be accessed through the Utility panel. I have added into the list of preset utilities with the little button at the top right.
When the Scene Effect Loader is open, you can press “Load Effect” to load a post-pro effect shader. Max has a few default ones (of which only a few still work) which are located in the “3DS Max/maps/fx/scene” directory. I loaded up post_bloom.fx. You enable the post effects by ticking the “Scene Effects” checkbox.
The problem with post_bloom, is that the default settings are total rubbish. To access and edit them, you need to select an empty material slot in the editor, and double click the post_bloom entry in the Post Effects list of the Scene Effect Loader. The post_bloom shader should be instanced into the empty slot.
My settings are illustrated below and should work for almost every scene, give or take a few decimals.

Leave a Reply
Want to join the discussion?Feel free to contribute!